Soaking up summer If you pay close attention you’ll begin to notice the angle of the sun is changing. The days are getting shorter and summer is beginning a long Minnesota goodbye*
It’s time to hurry. We run out of daylight before we run out of garden to harvest and each day is a frenzy to bring in the harvest as it ripens on the vine. Ripening aronia and blackberries, plums and apples fall faster than we can pick them.
We’ve reached the peak of summer. If you’re like me, the grieving begins. Coping skills begin to kick in at the cellular level for the cooler temps coming soon.
Reaching the pinnacle it’s obvious that fall will arrive in a blink. Let’s hope that September in the PNW gives us the few extra days we need to extend the growing season. We’ll be able to see our breath soon enough.
*Minnesota Goodbye. [expression: min-uh-sohta gud-bye] There are those who rip away Band-Aids. And there are those who nudge them off a millimeter at a time. Minnesotans are guilty of the latter when saying their awkward, interminable goodbyes.
After filling your upcycled/free raised bed with, you guessed it, free compost, surround with cardboard and woodchips. Sheet Mulching is great slug repellent, it also locks in moisture, insulates raised beds, creates natural pathways, encourages worm activity, manages run off and…and…and…
Get it free from ChipDrop.com, sign up every 28 days if you haven’t received a delivery. Reach out to local tree service companies. They’ll be happy to help.
July is a busy time for planting, harvesting and preserving! Pace yourself, August is just July 2.0. We do not subscribe to square foot gardening…there’s too many things wrong with this example. Don’t invite the pests to the party by planting this close together. Herbs will take over, the sunflower is a heavy feeder and too shady along with the tomatoes. Save yourself the frustration and follow the next slide for companion gardening.
Our suggestion: Leave berries entirely on their own. Contain. Contain. Contain. Herbs too. Oregano is beautiful when it flowers but spreads quickly. Major pollinator attractant. Borage too. Rosemary needs plenty of room, consider a decorative hedge, and mosquitos hate it. Garlic, chives, shallots, onions can be combined. Give them their own bed. Just because everything goes right, not everything thrives. Some years we can’t grow peas no matter what we try, other years it’s peppers. Nature happens. Climate/Phenology make a world of possible reasons for plants to thrive or fail.
Fall/Winter Harvest, Start In A Pot, Sow Outdoors, July Tips, Harvest/Preserve:
Tiny Human Beans are ideal for size comparisons, harvest zucchini now!
Managing Blossom Rot
Preventing Blossom End Rot on Tomatoes,
Peppers, Squash, Cucumber, & Melons
A water-soaked spot at the blossom end of tomato fruits is the classic symptom of blossom-end rot.
This relatively common garden problem is not a disease, but rather a physiological disorder caused by a calcium imbalance within the plant. It can occur in pepper, squash, cucumber, and melon fruits as well as tomatoes.
Blossom-end rot is most common when the growing season starts out wet and then becomes dry when fruit is setting. Damage first appears when fruits are approximately half their full size.
The water-soaked areas enlarge and turn dark brown and leathery. These areas will eventually begin to rot, so the fruit should be picked and discarded.
Several factors can limit a plant’s ability to absorb enough calcium for proper development. These include fluctuations in soil moisture (too wet or too dry), an excess of nitrogen in the soil, root damage due to cultivation, soil pH that’s either too high or too low, cold soil and soil high in salts.
Prevention and Control Maintain consistent levels of moisture in the soil throughout the growing season. When the weather is dry, water thoroughly once or twice each week to moisten the soil to a depth of at least 6 inches.
Prevent calcium deficiency with eggshells! Prep them in the oven at 250 degrees for 15 minutes to sterilize, place in blender and powder it up! Add to plants before or after planting.
In cold climates, allow soil to warm before planting; cold soils limit nutrient uptake. Maintain soil pH at or near 6.5. Use watering cones (Aqua Cones) to get water down into the root zone.
Apply mulch to minimize evaporation and
help maintain consistent soil moisture.
Keep garden records: You may discover that some crop varieties are more susceptible to blossom-end rot than others.
This cute little drying rack is useful and adds aromatic herbal scents throughout your kitchen while the herbs are hanging to dry.
By Moorea Seal Mother Earth Living
My favorite parts of any meal are the herbs and sauces, the details that make a meal come to life. Most meals call for just a dash of herbs, so when picking herbs from your garden or buying fresh herb bundles from the grocery store, you can save all your extras and dry them here on your drying rack for later use! It’s not only useful but decorative, and fills your kitchen with the scent of delicious dried herbs.
Materials and Tools
Baker’s twine
Measuring tape
Scissors
6 bunches fresh herbs (you can and these at your local grocery store, usually in the vegetable section in little plastic packaging—I used oregano, rosemary, thyme, bay leaves, tarragon, and sage)
1 (14-inch) embroidery hoop
9 (25-millimeter) wooden beads Superglue
6 clothespins
Ceiling hook
Steps
Cut your twine into six pieces, each 15 inches long.
Create a small loop at the end of each piece of twine.
Take one piece of twine and, using the unlooped end, wrap it around the base of one bunch of herbs, tying it off tightly and leaving the loop exposed.
Repeat this process with each bunch of herbs.
Remove the inner hoop from the embroidery hoop. You won’t be using the outer hoop, just the inner one.
Measure how far you would like your herb drying rack to hang from the ceiling. Take that measurement and add 10 inches. Now cut three pieces of twine to that length. I wanted mine to hang about 15 inches from the ceiling, so I cut three 25-inch pieces of twine.
Using about 5 inches of one piece of twine, wrap it a few times around the hoop, and tie off.
Repeat this process with the two other pieces of twine, making sure that the three pieces of twine are equal distances from each other.
String three wooden beads onto each of these pieces of twine.
Gather the loose ends of the three pieces of twine and tie them all together, leaving 5 inches between the knot and the end of each piece. Make sure that when you hold up the hoop by the twine, it looks balanced.
Create a loop with one of the 5-inch ends of twine. Using the superglue, glue the end of the loop to the base knot. Then wrap the two leftover 5-inch pieces of twine around the knot and glue the ends to the knot.
Using the clothespins, evenly attach the herb bundles to the hoop by clipping the clothespins to the hoop and to the loop of twine on the end of each herb bundle.
Evenly space your clothespins around the hoop so the herb bundles are balanced.
Now, simply screw in a ceiling hook where you want to hang your herb drying rack, and hang it up!
Build Bee Hotels to Help Save Native Bees Source: Ariana Marisolcontributing staff writer for REALfarmacy.com.
Bees are an integral part of our ecosystem. A garden with happy, healthy bees grows happy, healthy plants. Why not help these friendly pollinators even more by building “bee hotels”?
There are 4,000 species of bees that are native to North America and they are far more efficient in pollinating than the more commonly known European honeybee. Native bees are losing habitat at a dramatic rate and this is leading to a huge decline in population. You can help save these bees by creating a house for them in your garden. The bees will gladly thank you by pollinating your garden!
Over 90% of all bee species are solitary. This means each female will build her own nest in close proximity to other females of the same species. Bee hotels are usually made out of some sort of box or container that is filled with sticks, pinecones, bamboo shoots, or logs with drilled holes in them. These homes provide choices for bees and give them with shelter. Building a “bee hotel” only take a little bit of effort and material you probably already have.
You use bee houses to decorate your garden with these simple ideas.
You can use license plates to make sturdy roofs for your bee houses. You can repurpose a birdhouse for the house base and fashion a bent license plate on the top to create a cool roof. Take off the walls of a bird house and use the framing. Add either blocks of wood with holes drilled in them, or pieces of bamboo stalks to create small living areas for the bees.
You can use cardboard, clay pots, and bricks to create hibernation areas for your native bees. Use left over material you have no use for and put them together in an area by your garden. You can put sticks, pinecones, and cardboard all together in a clay pot and create an area for the bees. Situate them together nicely and create a beautiful creative hodgepodge of recycled garden material.
You can use cinderblocks to create multi-storied high-rise bee hotels. Put bamboo stalks or a a stump drilled with holes into the cinderblock gaps and create a nesting area for the bees. You can paint the cinderblocks to add some color to your garden. Cinderblocks are great to use because they will protect the bees from the elements.
Fill a mason jar with bamboo cuts or small tubes and create a wonderful small living space for bees. You can find an area to set it in your garden or you can suspend it from a branch or shed. You will be able to watch the bees move in because the bamboo tips will be filled with mud and other material.
Fill an upcycled wine box with bits of wood or bamboo canes and arrange them artistically. You can use different kinds of material for the nesting pods to add texture to your bee hotel.
Honey bees are not the only bees that need our protection and help. Add these quirky decorative homes to your garden and watch as the bees graciously thank you!
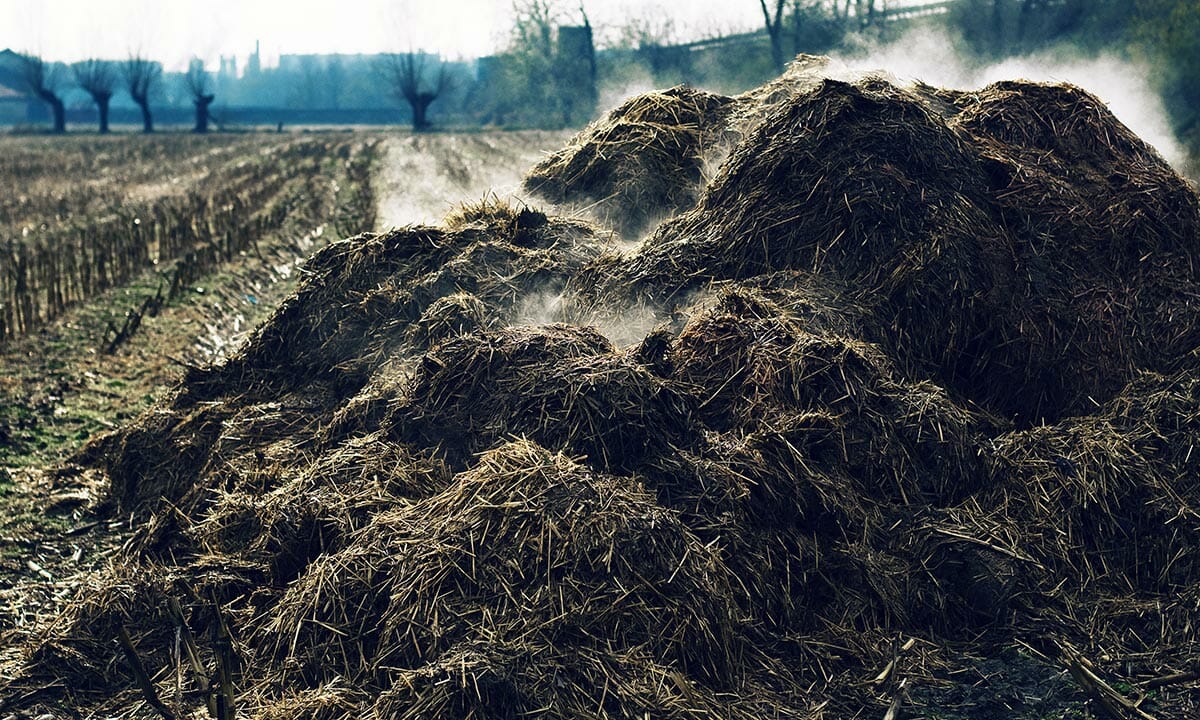
Whether a farmer has one cow or 1000, manure problems are the likeliest route to trouble with the neighbors.
Everybody poops; animals just happen to do it more than the rest of us. A lactating dairy cow can produce 150 pounds of manure every day. Twenty broiler chickens will produce over four pounds a day. Whether a farmer has one cow or 1,000, manure problems are the likeliest route to trouble with the neighbors.
So how do you solve a problem like manure? From non-farmers – with a horse to the largest industrial hen houses – people are coming up with ingenious ways to take the damage out of dung by sharing a necessary garden resource with folks looking for this very solution.
These mostly localized manure shares pair animal owners with gardeners, farmers and landscapers in need. Using mailing lists or sign-up sheets, most farmers looking to unload their manure give their location, fee (if any), whether they deliver, if the waste is raw or composted and the kind of animal the manure is from.
Manure Shares are grassroots programs often run by agricultural extension offices or conservation programs. They don’t cost much to run but are a simple solution for animal owners with just a little too much to go around. They help farmers by giving them a place to dispose of animal waste that’s only real benefit is to the soil. They help gardeners by providing an inexpensive and natural source of fertilizer for their plants. And they help the public by cutting down on environmental damage or health hazards associated with raw animal waste.
Source: Haphazard Homestead https://www.youtube.com/watch?v=ARaUBo9vDkY If you have some of these common wild plants, weeds, and trees in your yard, you could be eating an incredibly delicious wild salad, too. Forage 24 plants from your yard. Then turn them into an amazing salad with a wild salad dressing.
Even though spring is the easiest time for foraging a wild salad, there are still plenty of great wild edible plants to eat as late spring heads into summer.
The plants in order of appearance:
1. Common sowthistle – Sonchus oleraceus 2. Grand fir – Abies grandis 3. Spearmint – Mentha spicata 4. Wild field mustard – Brassica rapa 5. Wild garlic – Allium vineale 6. Chickweed – Stellaria media 7. Black locust – Robinia pseudoacacia 8. Sheep sorrel – Rumex acetosella 9. Blue Spruce – Picea pungens 10. Trailing blackberry – Rubus ursinis 11. Nipplewort – Lapsana communis 12. Cleavers – Galium aparine 13. Oregon grape – Mahonia aquifolium 14. Western Larch – Larix occidentalis 15. Dandelion – Taraxacum officinale 16. Common hawthorn – Crateagus monogyna 17. English daisy – Bellis perennis 18. Hedge mustard – Sisymbrium officinale 19. Curly dock – Rumex crispus 20. Bristly hawksbeard – Crepis setosa 21. Lemon balm – Melissa officinalis 22. White clover – Trifolium repens 23. American elm – Ulmus americana 24. Bittercress – Cardamine hirsuta
Here are some tips for making a great wild salad: 1. Focus on plants that are in good condition. 2. Pick clean. Look through what you pick, as you are picking it. leave the grass, pieces of other plants, and poor-quality plant parts out in the field. 3. Pick organized – and keep everything organized until you’ve double-checked it all, back in the kitchen 4. Chop the plants into tiny pieces 5. Keep some of the wild flowers aside, to mix into the chopped greens. It all looks nicer that way. 6. Use a simple salad dressing. Let the taste of all those wild plants shine. A simple oil and vinegar mix works fine!
Properly maintained quality garden tools are a joy to use and can last for generations. And, like most things, an ounce of prevention is worth a pound of cure. Regularly cleaning and oiling your garden tools will prevent rust, keep them sharper, and allow the handles to stay strong.
But if you’re like me, sometimes you’re not as diligent as you should be—putting your tools away dirty or leaving them outside in the weather. Then before you know it, they’re on the fast track to the trash bin.
Here’s how to get a shovel, or other garden tools, in shape and keep them that way.
Gather Your Weapons
To clean and maintain your tools, you’ll need the following:
Cleaning Supplies: Detergent, garden hose, sprayer, sponge, old rags or towels.
Cleaning Tools: Steel wool, scrub brush, wire brush, and a rotary wire brush attachment for your drill.
Sandpaper: (80 and 120 grit) Made to work on both wood and metal.
Sharpening Tools: A fine metal file and a sharpening stone to hone edges.
Lubricating Oil: Such as boiled linseed oil, tung oil, motor oil, lamp oil, or cooking oil. Boiled linseed and tung oil are probably the best choices, but you can use what you have on hand.
Safety Equipment: Wear gloves, eye protection, and a dust mask when working on tools.
Step 1: Clean Tools
Start by giving your tools a good scrubbing to remove any mud and grit from the blades and handles. Dry with old towels, then set them aside overnight so they dry completely to avoid trapping moisture.
Step 2: Remove Rust
Use steel wool or a wire brush to scrub away any rust that has accumulated on metal parts. A rotary wire brush attachment chucked in a drill can make the job easier. As a rule, you want to remove the rust with as little grinding and scraping of the steel as possible to keep tools from becoming thinner and weaker over time.
Step 3: Sand Tools
Smooth worn wooden handles with medium grit sandpaper to remove splinters and deteriorated finish. You can also use sandpaper to remove any remaining rust from surfaces and crevices and to lightly polish the metal. When finished, thoroughly wipe down the tools to remove any wood or metal sanding dust.
Step 4: Sharpen Tools
Use a metal file to lightly sharpen the edges of tools. Again, you don’t want to grind away too much of the metal, just use it to smooth out nicks, remove burrs, and give a nice clean edge. On some cutting tools (like hedge clippers and axes), you’ll need to follow up with a sharpening stone lubricated with oil for a finer edge.
Step 5: Oil Tools
Using a clean rag, apply lubricating oil to both the wooden handle and the metal blade. Rub the oil into the surface then wipe off any excess. The oil will help prevent rust and condition the wood to keep it from absorbing water and prevent cracking. After the handle has dried, apply a second coat of oil to the wood if needed. Tools with fiberglass or composite handles will only need a good cleaning.
Some gardeners prefer to sand wooden tool handles and reapply a coat of exterior finish such as spar varnish. If you do refinish your tool handles, make sure the wood is completely dry first. I prefer using oil simply because I’d rather do a quick wipe down, rather than taking the time to sand the wood, apply finish, and wait for it to dry, but it’s really a matter of preference.
That’s more like it! Now, to keep it that way.
Preventative Maintenance
Now that your gardening tools look like new, take the time to keep them that way! At the end of every gardening day, spend a few minutes to:
Rinse off mud and soil with a garden hose. Clinging wet soil is the main cause of rust on garden tools.
Scrub away stubborn soil with a scrub brush, and use paint thinner to remove sap and pitch.
Wipe tools dry with a rag or towel, or let them dry in the sun while you finish your chores.
Hang tools up rather than standing them on their edges.
Periodically wipe on a light coat of oil or spray surfaces with a penetrating oil. You can also put tools in a sand bucket to keep them clean and sharp.
Squashes and pumpkins are among the most thrilling vegetables you can grow. Speed, vitality and generous harvests – they’ve got it all!
Growing Squash from Sowing to Harvest
Whether you’re growing summer or winter squash, get your crop off to the best possible start with our sowing-to-harvest guide to these first-rate performers.
In this short video 5 minute video we’ll show you how to grow super squash – every time.